Thank you for purchasing the Xara brake for inline skates from Stopskate s.r.o.
We believe that with proper assembly and proper use, you will be very satisfied with this product and it will bring you a higher level of safety and comfort during your favorite activity.
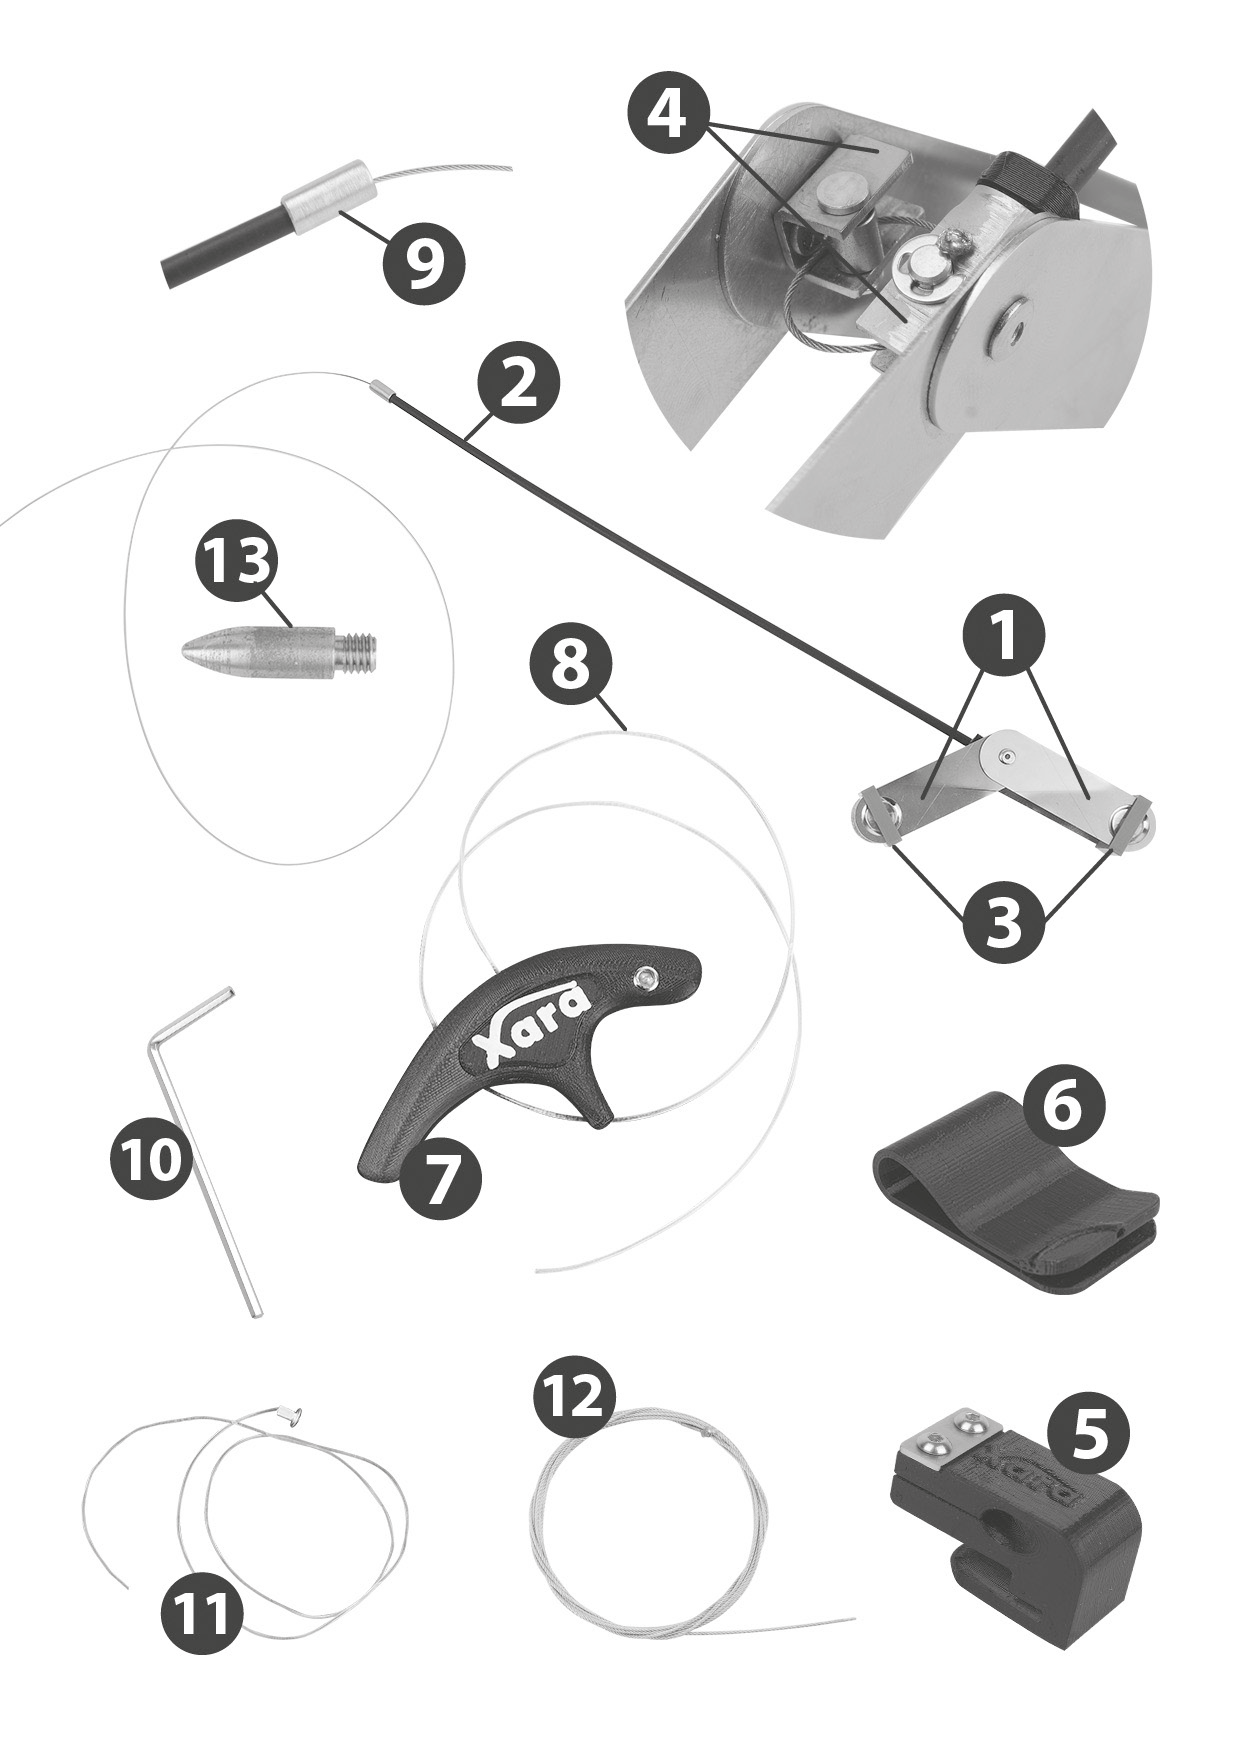
Product description / package contents
1. Brake plates (arms)
2. Bowden with cable
3. Mounting lock part
4. Pulley holders
5. Locking clip
6. Buckle
7. Handle
8. Elastic band
9. Aluminum bowden end cap
10. Allen key 2 mm
11. Spare rubber band
12. Spare cable
13. Centering screw
14. Assembly use and instructions
Note
1. The factory setting of the direction orientation of the pulley holders and the bowden is adapted to the installation on the right skate. If you prefer to brake/advance the left skate, rotate the pulley holders when mounted on the left skate so that the bowden points diagonally back and up as do the pulley holders. Bowden is always mounted on the outside of the skate shoe and should not touch any wheel of the skate.
2. Due to the type and print of the wheels, it may take a short time for the brake to perform its function at 100%. It may be necessary to “wear out” the wheels and their printings due to braking so that the contact surfaces of the brake plates have maximum braking effect.
3. In order to achieve optimal braking performance and minimal wheel wear when using the Xara brake, it is necessary to use high-quality wheels with perfect geometry – ovality, made of high-quality polyurethane.
Assembly
Mounting the brake on your inline skate is very easy. Follow these instructions:
1. Choose which skate (right or left) you will mount the brake on. While braking, you will slightly move this leg forward for better stability.
2. Remove the front and middle wheels for three-wheeled skates, or the second and third wheels for the four-wheeled skates (pic. 1)
3. We recommend removing all wheels from the skate frame before mounting the brake. This will increase the flexibility of the frame and make assembly easier.
4. Pass the bowden with the cable through a suitable hole in the skate frame so that the bowden does not touch any wheel and remove the red locking part with the inscription REMOVE at one end of the plates (pic. 2) and insert the free ends of the plates into the skate frame so that the holes in plates align with holes for the skate wheel screw (pic. 3.).
5. Put the wheel back in, align the holes in the frame, wheel and brake plates into one axis. Screw the centering screw pin onto the longer part of the axle, insert the axle with the pin into the frame/wheel hole (or use a 4mm Allen key for centering) and on the opposite side of the frame carefully unscrew the pin so that the axle remains centered and screw the shorter part of the axle (screw) instead the pin. Fix the wheel with the screw, but do not tighten it (pic. 4 + 4.1).
6. Remove the second lock of the brake plates (pic. 5) and align the ends of the plates with the holes for the wheel (pic. 6). The spacing of the holes at both ends of the brake plate can be changed by a certain extent by opening or closing the “V” shape formed by the plates (pic. 7 and pic. 8). If necessary, it is possible to turn the pulley holders so that the bowden does not touch the wheel. Always turn both pulley holders so that they are parallel.
7. Insert the wheel back into the frame, align the holes in the frame, wheel and brake plates to one axis and tighten the screws of both wheels firmly. If you have assembled the plates and wheels correctly, the wheels will turn freely. If not, repeat the procedure.
8. Pull the cable and bowden through the locking clip (pic. 10) and then slide this locking clip onto the skate frame under the buckle (pic. 11) or to another suitable place on the skate cuff or shell. The end of the bowden should be in the space between the end of the locking clip and the top edge of the shoe. The clip should be inserted in the direction of the ground, not from above, so that it does not fall out and when the handle is pulled, the clip remains in the specified position.
9. Tighten the locking screws on the side of the locking clip (pic. 12) using a 2 mm Allen key.
10. Stand on the skates.
11. Thread the aluminum bowden end onto the cable and slide it onto the bowden’s end. Insert the cable into the bottom hole of the handle and pull it as far as you can with the skates on when standing, so the handle is at the height of the palm of the lowered hand next to your thigh (pic. 13). Then firmly tighten the screw on the side of the handle (pic. 14) and shorten the rest of the cable with scissors to an overlap of approx. 3 cm (pic. 15). Insert this end into the secondary hole in the handle (pic. 16).
12. Insert the elastic band, which is pulled through the handle, into the hole in the lower edge of the fastening clip and pull it out (pic. 17 and pic. 18). For easier insertion, we recommend rotating the elastic band when inserting. Then pull it into the locking groove of the buckle (pic. 19). Slide the fastening clip onto the edge of your clothing (pic. 20). Choose the length of the elastic band so that it is adequately stretched when the standing leg is stretched, and that it still slightly stretches the brake cable when the leg is slightly bent while skating. Cut off the leftover of the elastic band.


Cable replacement
If the brake cable is damaged or broken, proceed as follows to replace it:
1. Remove the wheels and brake plates from the skate chassis.
2. There is a cable ending at the pulley holder – pull this cable out of the double pulley system.
3. Insert the new cable into this hole as shown in the image below.
4. Pull the cable through the bowden and proceed as when installing the brake.

Replacing the tension rubber
You can replace a cracked elastic band as follows:
Insert a thin object, such as a pin or the wire of a paper clip, into the hole from which the elastic band comes out and push downwards. Push the metal end of the elastic band out of the handle. Remove the original elastic band. Next, insert a new elastic band into the hole of the handle and press the metal end of the elastic band into the hole of the handle. Proceed as for the first installation of the brake.
Usage
By slightly pulling the brake handle upwards, you will achieve a braking effect. By pulling harder, the braking force will increase.
Always brake very sensitively and gradually! Before braking, slightly move the braked skate leg forward to improve your stability. Very intensive and frequent braking can increase the wear of the skate wheels.
Maintenance
The brake does not require special maintenance.
Occasionally, clean the space between the plates and the wheels from dust and other impurities so that the wheels can rotate freely.
Before skating, check the cable for wear or other damage.
If these is some damage, don’t hesitate to replace it.
Notice
Always brake in time and into a free space.
Always brake smoothly and allow a braking distance of min. 10 m.
Do not use the brake in road traffic.
Before starting to brake, slightly move the skate with the Xara brake forward to increase your stability. Transfer your weight to this skate to fully load the wheels.
Before skating, check whether the elastic band and the cable are intact.
The brake is not intended for braking when going down very steep or very long hills.
The Xara brake is suitable for slowing down and stopping during normal recreational riding on inline skates.
The braked wheels must always be in full contact with the road and must be loaded during braking by transferring the weight to the braked and advanced skate. For this reason, it is not recommended to exchange used skate wheels with each other.
The Xara brake is not intended for inline skate chassis with braces at the full height of the wheels due to the lack of space for the brake arms.


The Xara Stopskate brake is an additional brake and the skater must be able to stop in the event of a technical fault with another braking technique. The company Stopskate s.r.o. bears no responsibility for possible damage to property or the health of the skater or other people or animals.
Support
In case of questions, contact us at:
info@stopskate.com or phone: +420 773 238 160
For more support, visit: www.stopskate.com
Warranty
The warranty period for this product is 3 years. It refers to the functionality of the system and the complete package.
Does not apply to the brake cable and tension rubber, which are consumables. You can order this spare material at: www.stopskate.cz, or from Xara brake dealers.
Producer:
Stopskate s.r.o.
Stupkova 18, 77900 Olomouc
Czech Republic
www.stopskate.com
